本ページは広告が含まれています。気になる広告をクリック頂けますと、サーバ運営費になります(^^
DebianにNginxを利用しHLS配信する。
サーバは、Cloudn(Niftyのクラウドサービス)で、構築したUbuntu Server(おお、って事は正確にはDebianじゃないのかぁ。けど操作性は一緒のはず)
サーバは、Cloudn(Niftyのクラウドサービス)で、構築したUbuntu Server(おお、って事は正確にはDebianじゃないのかぁ。けど操作性は一緒のはず)
あ、一応一番安い環境でと思ったけど10万円のクーポンもあるし、時間短縮で、一番高性能サーバでやってみよう。Nginxをmakeしなきゃなんないし。
おかしいなぁ。確か、起動したままCPU性能変えられる(スケーラビリティ)をうたってたはずだけど、できないなぁ。
仮想サーバ停止したら、編集画面からDebianが選べるようになったので使い慣れてるDebianに変更。
しゃぁない。このままmake入る。
必要ファイルの取得
Nginxソース取得
RTMPモジュール取得
でConfigureしてMakeインストール
※Configureする時に、rtm-moduleへのパスを間違えないように
sudo apt-get install git libpcre3-dev zlib1g-dev openssl libssl-dev make gcc
wget http://nginx.org/download/nginx-1.12.0.tar.gz
git clone https://github.com/arut/nginx-rtmp-module.git
tar xvzf nginx-1.12.0.tar.gz
sudo ./configure --sbin-path=/usr/sbin/nginx --conf-path=/etc/nginx/nginx.conf --add-module=../nginx-rtmp-module --prefix=/usr/local/nginx
nginx path prefix: "/usr/local/nginx"
nginx binary file: "/usr/sbin/nginx"
nginx configuration prefix: "/etc/nginx"
nginx configuration file: "/etc/nginx/nginx.conf"
nginx pid file: "/usr/local/nginx/logs/nginx.pid"
nginx error log file: "/usr/local/nginx/logs/error.log"
nginx http access log file: "/usr/local/nginx/logs/access.log"
nginx http client request body temporary files: "client_body_temp"
nginx http proxy temporary files: "proxy_temp"
nginx http fastcgi temporary files: "fastcgi_temp"
nginx http uwsgi temporary files: "uwsgi_temp"
nginx http scgi temporary files: "scgi_temp"

sudo make install
あれ、意外と早い。1分かからずにmake完了
Nginxコンフィグの編集 最終行に追加
sudo vi /etc/nginx/nginx.conf

rtmp {
   server {
      listen 1935;

      access_log logs/rtmp_access.log;

      application live {
         live on;
         hls on;
         hls_path /usr/local/nginx/html/live/hls;

         hls_type live;
     }
   }
}
ディレクトリの作成
sudo mkdir /usr/local/nginx/html/live
sudo mkdir /usr/local/nginx/html/live/hls
Nginx起動
sudo /usr/sbin/nginx
80と、1935で待ち受け開始しているか確認
ubuntu@EizoSmall01:/usr/local/nginx/html/live$ sudo netstat -an |egrep :80
tcp 0 0 0.0.0.0:80 0.0.0.0:* LISTEN

ubuntu@EizoSmall01:/usr/local/nginx/html/live$ sudo netstat -an |egrep :1935
tcp 0 0 0.0.0.0:1935 0.0.0.0:* LISTEN
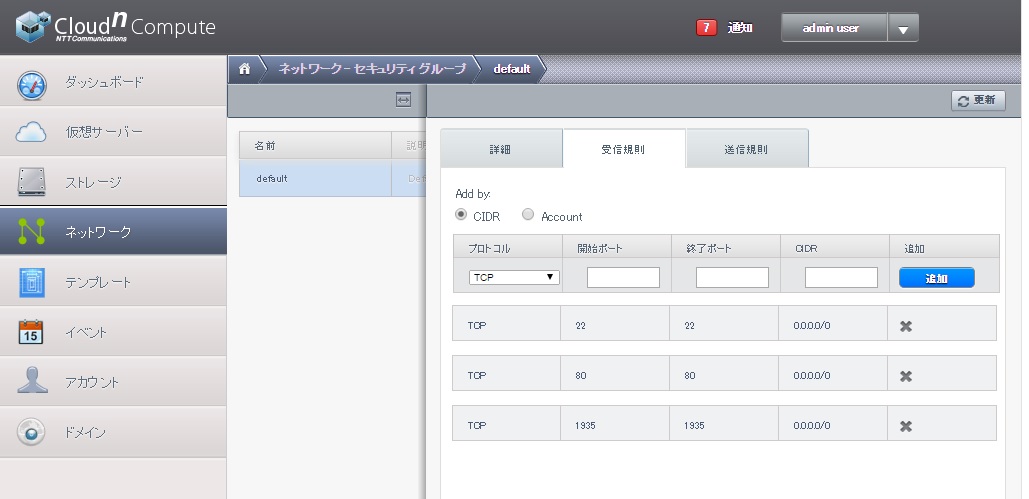
で、Cloudnではファイヤーウォールが働いているから
1935と、80に穴を空ける

1c72583a214d91c4891c17e5eebdf0cc.jpg
映像配信開始
OBSを起動
rtmp://IPアドレス/live
ストリームキー test
おお!配信始まる
ubuntu@EizoSmall01:/usr/local/nginx/html/live/hls$ ls
test-0.ts test-1.ts test-2.ts test.m3u8
うん、ちゃんとm3u8とtsファイル群ができてる
VLC Player起動 ネットワークストリームを開く
アドレス/live/hls/test.m3u8http://IP
topコマンドでCPU使用率を見てみる
1%程度で、余裕って感じ。ただ、メモリ使用率がダメかな。freeスペースがほとんどない。接続数が増えるとうまくないと思う。

top.jpg

