本ページは広告が含まれています。気になる広告をクリック頂けますと、サーバ運営費になります(^^
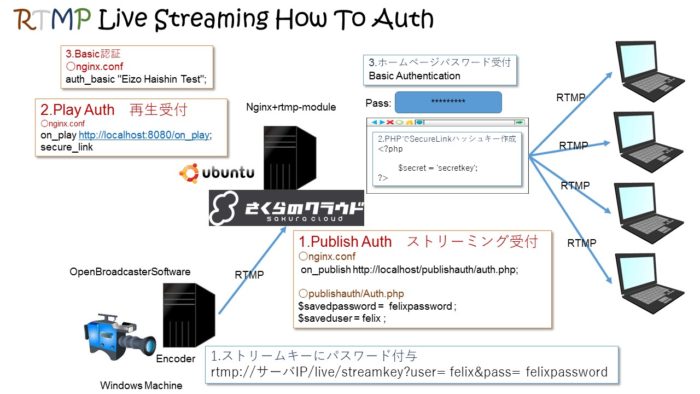
nginxに rtmp-moduleを組み込みvideo.jsを利用してwebでライブ映像配信する方法も定型化してきたので、まとめてみます。とりあえずこのサイトを確認すれば一通り設定方法が分かるというページ構成を目指してみます。
ただ、まとめてみると、かなり要素がありますね。どうしても概要的なページになりそうです。詳しくは一つ一つ解説したサイトを見ていただいた方がいいかも。
エンコーダはOBSを利用し、on_playを通して、ユーザ名・パスワード文字列が合致しないと配信できない仕組みにします。
セキュリティはセキュアリンク機能を利用して、配置したwebプレーヤでないと見れないようにします。また、そのwebプレーヤは、nginxにてベーシック認証されたものだけ閲覧を許可します。
コントロールパネルを設置して、どのくらいの人が閲覧しているかを確認できるようにします。
nginxとrtmp-moduleのインストール
nginxのサイトから、stableの最新バージョンをダウンロードします。mainlineでも構わないかもですが、私は安定性にこだわりたいので、stableを選択しています。
[browser-shot url=”https://nginx.org/en/download.html” width=”600″ height=”300″ target=”_blank”]
wget https://nginx.org/download/nginx-1.12.2.tar.gz
(windowsではない方をダウンロードします。)
arutさん作のnginx-rtmp-moduleをgit cloneします。
[browser-shot url=”https://github.com/arut/nginx-rtmp-module” width=”600″ height=”300″ target=”_blank”]
コンパイルするために必要なプログラムをapt-getして、解凍されたnginxソースフォルダに入り .configureした後 make installします。ご自分の環境に合わせてディレクトリ階層をご検討ください。
wget http://nginx.org/download/nginx-1.12.0.tar.gz
git clone https://github.com/arut/nginx-rtmp-module.git
tar xvzf nginx-1.12.0.tar.gz
apt-get install libpcre3-dev zlib1g-dev openssl libssl-dev make gcc
cd nginx-1.12.0
./configure --sbin-path=/usr/sbin/nginx --conf-path=/etc/nginx/nginx.conf --add-module=../nginx-rtmp-module --with-debug --prefix=/usr/local/nginx --with-http_secure_link_module --user=www-data --group=www-data
make install
セキュアリンクを利用したい時にこのオプションを利用します。
–with-http_secure_link_module
PHPを実行する際に実行権限を与えるためこのオプションを利用します。
–user=www-data –group=www-data
※Debian系Linuxの場合、webを実行するユーザがwww-dataになるので、ユーザを指定しておきます。
※インストールから映像配信できるかまでの単純な解説はこちらへ
PHPのインストール
ubuntuで設定する場合と、Debianで設定する場合、バージョンなどに若干違いがあり、コンフィグの書き方に差が出ます。
ubuntuの場合
apt-get install php php-cgi php-cli php-fpm
Debianの場合
apt-get install php5-common php5-cgi php5-cli php5-fpm
nginx.confの設定
再生時にセキュアリンクをつけているのが大きな特徴です。セキュアリンクがないと
rtmp://サーバー名/配信ポイント
とすると、誰でもアクセスされてしまいます。特にhttpのベーシック認証などは通らなくても上記は有効になってしまいセキュリティ的に問題です。そこで、日時によるハッシュ生成し、指定された計算方法でハッシュ値が合致しないと表示させないのがセキュアリンクです。
私の場合は、プレーヤ側でハッシュ値を算出する部分をPHPで実現しました。そこで、PHPも有効になっている必要があります。そのPHPのページはベーシック認証にて保護してあります。
ubuntuの場合(PHPのfastcgi_passがdebianと変わる)
worker_processes  1;
events {
    worker_connections  1024;
}
http {
    include       mime.types;
    default_type  application/octet-stream;
    sendfile        on;
    keepalive_timeout  65;
    server {
        listen       80;
        server_name  localhost;
        location / {
            root   html;
            index  index.html index.htm;
        }
        error_page   500 502 503 504  /50x.html;
        location = /50x.html {
            root   html;
        }
        location ~ \.php$ {
                fastcgi_pass unix:/var/run/php/php7.0-fpm.sock;
                fastcgi_index index.php;
                fastcgi_param SCRIPT_FILENAME $document_root$fastcgi_script_name;
                include fastcgi_params;
        }
        #セキュアリンク付認証ページをPHPで実現する
        location /live/ {
                auth_basic "Eizo Haishin";
                auth_basic_user_file "/usr/local/nginx/passwd/.htpasswd";
                location ~ \.php$ {
                        fastcgi_pass unix:/var/run/php/php7.0-fpm.sock;
                        fastcgi_index index.php;
                        fastcgi_param SCRIPT_FILENAME $document_root$fastcgi_script_name;
                        include fastcgi_params;
                }
        }
       #ダッシュボードページ
       location /dashbord/ {
                auth_basic "Eizo Haishin Test";
                auth_basic_user_file "/usr/local/nginx/passwd/.htpasswd";
                add_header Cache-Control no-cache;
        }
    }
    #再生時セキュアリンクがないとエラーが出るように設定
    server {
       listen 8080;
       server_name localhost;
       location /on_play {
          secure_link $arg_st,$arg_e;
          secure_link_md5 secretkey$arg_app/$arg_name$arg_e;
          if ($secure_link = "") {
             return 501;
          }
          if ($secure_link = "0") {
             return 502;
          }
          return 200;
       }
       #録画する時は自サーバにアクセスしたものしか認めない
       location /control {
                valid_referers server_names sakura.hanako.or.jp;
                if ($invalid_referer) { return 403; }
                rtmp_control all;
        }
        #ステータス画面を見るためには自サーバにアクセスしたものしか認めない
        location /stat {
                valid_referers server_names sakura.hanako.or.jp;
                if ($invalid_referer) { return 403; }
                rtmp_stat all;
                rtmp_stat_stylesheet /stat.xsl;
        }
        location /stat.xsl {
            root html;
        }
    }
}
rtmp {
      server {
         listen 1935;
         buflen 5s;
         drop_idle_publisher 5s;
         publish_notify on;
         max_message 2500000;
         access_log logs/rtmp_access.log;

         application live {
            live on;
            record off;

            #auth.phpに書かれたユーザ名・パスワードを配信ポイントに掲載しないと配信できないようにする
            on_publish http://localhost/publishauth/auth.php;
            notify_method get;
         }
   }
}
Debianではこのように設定してうまくいっています
        location /live/ {
            auth_basic "ライブ認証";
            auth_basic_user_file "/usr/local/nginx/passwd/.htpasswd";
            location ~ \.php$ {
                fastcgi_pass unix:/var/run/php5-fpm.sock;
                fastcgi_index index.php;
                fastcgi_param SCRIPT_FILENAME $document_root$fastcgi_script_name;
                include fastcgi_params;
            }
        }
liveの中でphpにパスワードをかけるようにしている理由は、publishauthディレクトリにパスワードがかからないようにするためです。on_playをとおしてauth.phpを開く際にパスワードがかかっているとエンコーダから配信サーバに向けての配信時認証がかからなくなってしまいます。
nginxの手動起動・終了
設定途中でうまくいっているか確認したくなります。起動スクリプトを作成する前だったら
nginxの起動
/usr/sbin/nginx
nginxの終了
/usr/sbin/nginx -s stop
nginxの再起動
/usr/sbin/nginx -s reload
というコマンドで試す事ができます。コンフィグに書き間違いなどがあるとこの時点で起動できないので分かります。
video.jsの配置
webプレーヤを配置します。まずはvideo.js,videojs-contrib-hls,videojs-contrib-media-sourcesを取得します。
apt install npm
npm install --save-dev video.js
npm i videojs-contrib-hls
npm i videojs-contrib-media-sources
取得したjsファイルを、httpでアクセスできる位置に配置します。
~/videojs-contrib-media-sources/dist$ sudo cp * /usr/local/nginx/html/live/videojs/
~/videojs-contrib-hls/dist$ sudo cp * /usr/local/nginx/html/live/videojs/
~/video.js/dist$ sudo cp video* /usr/local/nginx/html/live/videojs/
hls自動速度調整したい場合は、こちらも一緒に配置するls
git clone https://github.com/videojs/videojs-contrib-quality-levels.git
cd videojs-contrib-quality-levels
npm i
npm run build
なんか良く分からないエラーが出ました。私はnpmの事は良く分からないのですが、色々情報をあさりながら
npm cache clean
npm install n -g
n stable
npm i
npm run build
とする事で無事build出来ました。どうもapt-get で入るNode.jsのバージョンが古いせいなのか?と思いますがはっきり断定できません。とりあえず
videojs-contrib-quality-levels/dist内に作成された
videojs-contrib-quality-levels.min.js
もvideojsフォルダに放り込みます
配信パスワードの設定
エンコーダから映像配信サーバに映像配信を始める際に、パスワード文字列が合わないと映像配信できないようにする事が出来ます。
auth.php を任意の場所に配置します。
<?php
// www.server.com/auth.php?user=felix&pass=felixpassword

//check if querystrings exist or not
if(empty($_GET['user']) || empty($_GET['pass']))
   {
    //no querystrings or wrong syntax
    echo "File not found.";
    header('HTTP/1.0 404 Not Found');
    exit(1);
   }

else
   {
    //querystring exist
    $username = $_GET['user'];
    $password = $_GET['pass'];
   }

//エンコーダから映像配信を始める際のユーザ名・パスワード
$savedpassword =  passwd;
$saveduser = user;


//check pass and user string
if (strcmp($password,$savedpassword)==0 &&  strcmp($username,$saveduser)==0 )
      {
        echo "Password and Username OK! ";

        }

else
      {
        echo "password or username wrong! ";
        header('HTTP/1.0 404 Not Found'); //kein stream
        }

?>
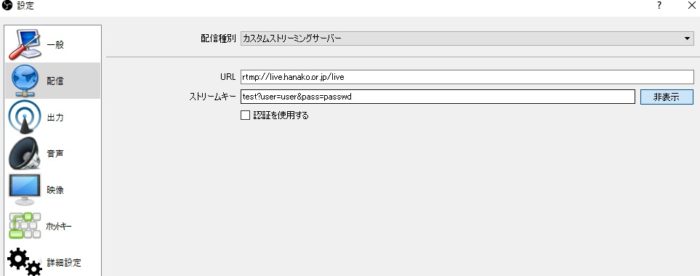
OBSを利用して配信開始
OBSを利用して配信開始します。
配信ポイントはこのように設定します
rtmp://サーバIP/live/streamkey?user=user&pass=passwd
?から後は通常必要ありませんが、nginx.conf で、on_publishを設定し、上記auth.phpで認証情報を保存してあるので、これを使います。この事で配信ポイントがばれて、誰でもエンコーダから映像が送れるような事がないようにします。
Nginxにベーシック認証を搭載
Basic認証を行うためにapacheのモジュールを利用してパスワードファイルを作成します。
apt-get install apache2-utils

/usr/local/nginx/html/passwd# htpasswd -c ./.htpasswd user
New password:
Re-type new password:
Adding password for user user
webプレイヤーvideo.jpを配置する
セキュアリンクを有効にした形で、webプレイヤーを利用できるようにします。secretkeyは、nginx.confで設定したものと文字列を合わせます。できたmd5ハッシュコードは1時間有効です。もし漏れたとしても、1時間のうちにアクセスしないとその後は拒否されます。
<html>
   <head>
      <link href="../videojs/video-js.css" rel="stylesheet">
      <script src="../videojs/video.js"></script>
   </head>
   <body>
      <video id="rtmp_test" class="video-js vjs-default-skin" autoplay="autoplay" controls="controls" width="1280" height="720" data-setup="{}">
      <?php
         // 秘密鍵 になります。なんでもOKですので、ここでは日本語(UTF-8)で設定してみます。
         $secret = 'secretkey';
         // セキュアなリンク からでないとアクセスできないURIを設定します。
         $path   = 'live/test';
         // 公開鍵として、有効期限を time() + 秒 で設定します。
         // -- この有効期限の設定の仕方は、Nginxではこの方法でしか認識できません。
         $timestamp = time() + 3600; // 60(秒) x 60(分) = 3600(秒) = 1(時)

         // "秘密鍵 + パス + 公開鍵" を Nginxで扱うことができる md5 で暗号化します。
         $hash = base64_encode(md5($secret . $path . $timestamp, true));
         // +,/,= は、URLパラメータとして扱えないので、置換します。
         $hash = strtr($hash, '+/', '-_');
         $hash = str_replace('=', '', $hash);

         //  セキュアなリンクを出力します。
         $url = "{$path}?e={$timestamp}&st={$hash}";
         echo '<source src="rtmp://live.hanako.or.jp/'.$url.'" type="rtmp/mp4" />'
      ?>

      </video>
   </body>
</html>
アクセス統計情報ダッシュボードの作成
映像配信サーバを構築すると、どのくらいのアクセス数があるのか、どのくらいの帯域幅で映像配信がされているのか知りたくなります。回線状況に合わせて運用を変える必要もでてきます。nginx rtmp-moduleには、便利なアクセス統計情報をwebで表示できる機能があります。
コピーしたstat.xslファイルをトップに置きます。そのまま直接stat.xslファイルにアクセスできるようにしてもいいですが、他のサーバのstatファイル参照や、録画ボタン生成のため、これをカバーするhtmlを作成しました。
/usr/local/nginx/html/dashbord# cat control.html
<html>
  <head>

  </head>
  <body>
    <H3>hanako Dashbord</H3>
        <div style="clear:both;font-size:10px;">
             <iframe frameBorder="0" seamless src="http://live.hanako.or.jp:8080/stat" width="1300px" height="600px"></iframe>
        </div>

  </body>
</html>
nginx 自動起動スクリプト
init.dから起動できるようにします。さらに再起動時自動的にnginxが起動されるようにします。
vi /etc/init.d/nginx
#!/bin/sh

### BEGIN INIT INFO
# Provides:   nginx
# Required-Start:    $local_fs $remote_fs $network $syslog $named
# Required-Stop:     $local_fs $remote_fs $network $syslog $named
# Default-Start:     2 3 4 5
# Default-Stop:      0 1 6
# Short-Description: starts the nginx web server
# Description:       starts nginx using start-stop-daemon
### END INIT INFO

PATH=/usr/local/sbin:/usr/local/bin:/sbin:/bin:/usr/sbin:/usr/bin
DAEMON=/usr/sbin/nginx
NAME=nginx
DESC=nginx

test_nginx_config() {
  if $DAEMON -t $DAEMON_OPTS >/dev/null 2>&1; then
    return 0
  else
    $DAEMON -t $DAEMON_OPTS
    return $?
  fi
}

start() {
    test_nginx_config
    # Check if the ULIMIT is set in /etc/default/nginx
    if [ -n "$ULIMIT" ]; then
      # Set the ulimits
      ulimit $ULIMIT
    fi
    start-stop-daemon --start --quiet --pidfile /var/run/$NAME.pid \
      --retry 5 --exec $DAEMON -- $DAEMON_OPTS || true
}

stop() {
    start-stop-daemon --stop --quiet --pidfile /var/run/$NAME.pid \
      --retry 5 --exec $DAEMON || true
}

case "$1" in
  start)
    echo -n "Starting $DESC: "
    start
    echo "$NAME."
    ;;

  stop)
    echo -n "Stopping $DESC: "
    stop
    echo "$NAME."
    ;;
  restart|force-reload)
    echo -n "Restarting $DESC: "
    stop
    sleep 1
    echo "$NAME."
    start
    ;;

  reload)
    echo -n "Reloading $DESC configuration: "
    test_nginx_config
    start-stop-daemon --stop --signal HUP --quiet --pidfile /var/run/$NAME.pid \
      --exec $DAEMON || true
    echo "$NAME."
    ;;

  configtest|testconfig)
    echo -n "Testing $DESC configuration: "
    if test_nginx_config; then
      echo "$NAME."
    else
      exit $?
    fi
    ;;

  status)
    status_of_proc -p /var/run/$NAME.pid "$DAEMON" nginx && exit 0 || exit $?
    ;;

  *)
    echo "Usage: $NAME {start|stop|restart|reload|force-reload|status|configtest}" >&2
    exit 1
    ;;
esac
nginx.confに追記
vi /etc/nginx/nginx.conf

pid /var/run/nginx.pid;
スクリプトに実行権限を与える
chmod 755 nginx
起動スクリプトの登録
update-rc.d nginx defaults