本ページは広告が含まれています。気になる広告をクリック頂けますと、サーバ運営費になります(^^
nginx + rtmp module
RTMP配信サーバを構築します。
年々、Debianバージョンや、nginxバージョンが更新されちょっとずつコマンドが変わったりするので、最新の構築方法メモです。
Debian GNU/Linux 9.6
インストール操作は変わりませんが、パッケージ類がちょっと変わっています。
ここから導入用メディアをダウンロードして、インストールします。
nginx stable
wget http://nginx.org/download/nginx-1.14.1.tar.gz
tar xzvf nginx-1.14.1.tar.gz
nginx-rtmp-moduel
apt-get install git
git clone  https://github.com/arut/nginx-rtmp-module.git
configureとmake
apt-get install libpcre3-dev zlib1g-dev openssl libssl-dev make gcc
cd nginx-1.14.1
/configure --sbin-path=/usr/sbin/nginx --conf-path=/etc/nginx/nginx.conf --add-module=../nginx-rtmp-module --with-debug --prefix=/usr/local/nginx --with-http_secure_link_module --user=www-data --group=www-data
phpのインストール
apt-get install php php-cgi php-cli php-fpm
配信パスワードの仕組み
エンコードしたrtmpを受け付ける時に、パスワードなしで受け付けちゃうと攻撃を受けやすいので、ちょっとしたセキュリティをかけておきます。
cd /usr/local/nginx/html/
mkdir publishauth
cd publishauth/
cat auth.php
// www.server.com/auth.php?user=felix&pass=felixpassword

//check if querystrings exist or not
if(empty($_GET['user']) || empty($_GET['pass']))
   {
    //no querystrings or wrong syntax
    echo "File not found.";
    header('HTTP/1.0 404 Not Found');
    exit(1);
   }

else
   {
    //querystring exist
    $username = $_GET['user'];
    $password = $_GET['pass'];
   }

$savedpassword =  livepass;
$saveduser = liveuser;


//check pass and user string
if (strcmp($password,$savedpassword)==0 &&  strcmp($username,$saveduser)==0 )
      {
        echo "Password and Username OK! ";

        }

else
      {
        echo "password or username wrong! ";
        header('HTTP/1.0 404 Not Found'); //kein stream
        }

?>
nginx.confの設定
grep -v '^\s*#' /etc/nginx/nginx.conf |grep -v '^\s*
nginx起動試験
/usr/sbin/nginx

nginxの終了
/usr/sbin/nginx -s stop

80ポートが動いているか
#  netstat -an |egrep :80
tcp        0      0 0.0.0.0:80              0.0.0.0:*               LISTEN

1935ポートが動いているか
#  netstat -an |egrep :1935
tcp        0      0 0.0.0.0:1935            0.0.0.0:*               LISTEN
php動作試験
phpプロセスが動いているか
# ps aux |egrep 'www-data'
www-data 20970  0.0  0.1 222040  6176 ?        S    09:18   0:00 php-fpm: pool www
www-data 20971  0.0  0.1 222040  6176 ?        S    09:18   0:00 php-fpm: pool www
www-data 22127  0.0  0.0  40108  3920 ?        S    09:46   0:00 nginx: worker process
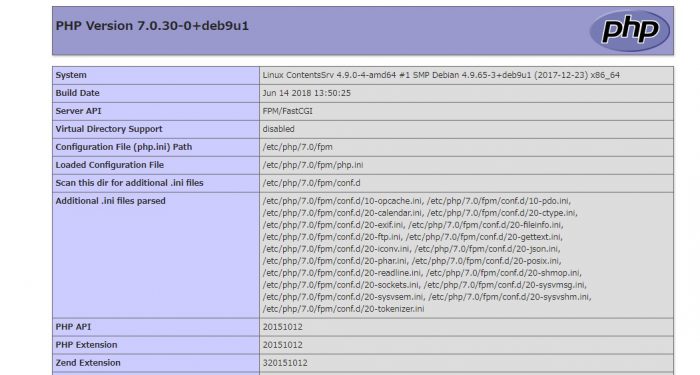
phpinfoを置いてみる
vi /usr/local/nginx/html/phpinfo.php
<?php
phpinfo();
?>
http://サーバIP/phpinfo.php にアクセス

ダッシュボード作成
アクセス数は測りたいのでダッシュボードを作成しとく。ローカルホストのHTMLにアクセスした場合にだけ表示する
    server {
       listen 8080;
       server_name localhost;

        location /stat {
                rtmp_stat all;
                rtmp_stat_stylesheet /stat.xsl;
        }

        location /stat.xsl {
            root html;
        }

    }
stat.xmlファイルをhtmlフォルダにコピーしておく
root@ContentsSrv:/usr/local/nginx/html# cp /home/ubuntu/nginx-rtmp-module/stat.xsl .
統計情報が表示できるか確認
へアクセス

ntpの設定
やっぱり最小限と言ってもntpは欠かせないでしょう。ログの時刻が狂ってると良く分からなくなりますから。
apt-get install ntp
昔はntpサーバのっせいもこってやっていたけど、最近はめんどくさいのでデフォルトでそのままです。(^^♪
# ntpq -pn
     remote           refid      st t when poll reach   delay   offset  jitter
==============================================================================
 0.debian.pool.n .POOL.          16 p    -   64    0    0.000    0.000   0.000
 1.debian.pool.n .POOL.          16 p    -   64    0    0.000    0.000   0.000
 2.debian.pool.n .POOL.          16 p    -   64    0    0.000    0.000   0.000
 3.debian.pool.n .POOL.          16 p    -   64    0    0.000    0.000   0.000
 122.215.240.51  103.1.106.69     2 u    -   64    1   25.037   -1.428   0.642
 210.173.160.27  133.243.236.17   2 u    2   64    1   15.975   -1.068   0.084
*133.243.238.163 .NICT.           1 u    1   64    1   19.330   -0.592   0.479
 133.167.77.169  131.113.192.40   2 u    2   64    1   16.325   -3.737   0.123
 13.230.38.136   133.243.238.244  2 u    5   64    1   22.368   -5.032   0.349
 210.173.160.87  133.243.236.17   2 u    1   64    1   22.684   -1.791   0.689
 133.243.238.164 .NICT.           1 u    1   64    1   22.259   -4.058   0.649
 117.102.176.202 131.113.192.40   2 u    -   64    1   30.287   -5.214   0.780
 129.250.35.250  249.224.99.213   2 u    1   64    1   10.667   -4.357   0.461
 133.243.238.244 .NICT.           1 u    1   64    1   16.251   -1.884   0.214
 122.215.240.52  103.1.106.69     2 u    2   64    1   18.007   -1.365   0.076
 54.64.6.78      133.243.238.164  2 u    1   64    1   23.192   -7.118   0.365
nginx起動スクリプト
# vi /etc/init.d/nginx
#!/bin/sh

### BEGIN INIT INFO
# Provides:   nginx
# Required-Start:    $local_fs $remote_fs $network $syslog $named
# Required-Stop:     $local_fs $remote_fs $network $syslog $named
# Default-Start:     2 3 4 5
# Default-Stop:      0 1 6
# Short-Description: starts the nginx web server
# Description:       starts nginx using start-stop-daemon
### END INIT INFO

PATH=/usr/local/sbin:/usr/local/bin:/sbin:/bin:/usr/sbin:/usr/bin
DAEMON=/usr/sbin/nginx
NAME=nginx
DESC=nginx

test_nginx_config() {
  if $DAEMON -t $DAEMON_OPTS >/dev/null 2>&1; then
    return 0
  else
    $DAEMON -t $DAEMON_OPTS
    return $?
  fi
}

start() {
    test_nginx_config
    # Check if the ULIMIT is set in /etc/default/nginx
    if [ -n "$ULIMIT" ]; then
      # Set the ulimits
      ulimit $ULIMIT
    fi
    start-stop-daemon --start --quiet --pidfile /var/run/$NAME.pid \
      --retry 5 --exec $DAEMON -- $DAEMON_OPTS || true
}

stop() {
    start-stop-daemon --stop --quiet --pidfile /var/run/$NAME.pid \
      --retry 5 --exec $DAEMON || true
}

case "$1" in
  start)
    echo -n "Starting $DESC: "
    start
    echo "$NAME."
    ;;

  stop)
    echo -n "Stopping $DESC: "
    stop
    echo "$NAME."
    ;;
  restart|force-reload)
    echo -n "Restarting $DESC: "
    stop
    sleep 1
    echo "$NAME."
    start
    ;;

  reload)
    echo -n "Reloading $DESC configuration: "
    test_nginx_config
    start-stop-daemon --stop --signal HUP --quiet --pidfile /var/run/$NAME.pid \
      --exec $DAEMON || true
    echo "$NAME."
    ;;

  configtest|testconfig)
    echo -n "Testing $DESC configuration: "
    if test_nginx_config; then
      echo "$NAME."
    else
      exit $?
    fi
    ;;

  status)
    status_of_proc -p /var/run/$NAME.pid "$DAEMON" nginx && exit 0 || exit $?
    ;;

  *)
    echo "Usage: $NAME {start|stop|restart|reload|force-reload|status|configtest}" >&2
    exit 1
    ;;
esac
実行権限を与え
chmod 755 /etc/init.d/nginx
登録する
update-rc.d nginx defaults

ちゃんと登録されているか確認

# ls /etc/rc2.d/
S01anacron       S01console-setup.sh  S01dbus     S01nginx  S01php7.0-fpm  S01rsyslog  S01speech-dispatcher  S01wicd
S01avahi-daemon  S01cron              S01lightdm  S01ntp    S01rsync       S01saned    S01ssh
この環境にCMSを‼
このnginx環境にCMSを置きたいと思いまして、合わせて構築しました。

worker_processes 1; events { worker_connections 1024; } http { include mime.types; default_type application/octet-stream; sendfile on; keepalive_timeout 65; server { listen 80; server_name localhost; location / { root html; index index.html index.htm; } error_page 500 502 503 504 /50x.html; location = /50x.html { root html; } location ~ \.php$ { fastcgi_pass unix:/var/run/php/php7.0-fpm.sock; fastcgi_index index.php; fastcgi_param SCRIPT_FILENAME $document_root$fastcgi_script_name; include fastcgi_params; } } } tmp { server { listen 1935; notify_method get; buflen 5s; drop_idle_publisher 5s; publish_notify on; wait_key on; wait_video on; sync 10ms; application translate { live on; on_publish http://localhost/publishauth/auth.php; #LANからの映像配信しか受け付けない allow publish 192.168.0.0/16; deny publish all; } } }
nginx起動試験
php動作試験
phpinfoを置いてみる
http://サーバIP/phpinfo.php にアクセス

ダッシュボード作成
アクセス数は測りたいのでダッシュボードを作成しとく。ローカルホストのHTMLにアクセスした場合にだけ表示する
stat.xmlファイルをhtmlフォルダにコピーしておく
統計情報が表示できるか確認
へアクセス

ntpの設定
やっぱり最小限と言ってもntpは欠かせないでしょう。ログの時刻が狂ってると良く分からなくなりますから。
昔はntpサーバのっせいもこってやっていたけど、最近はめんどくさいのでデフォルトでそのままです。(^^♪
nginx起動スクリプト
実行権限を与え
登録する
この環境にCMSを‼
このnginx環境にCMSを置きたいと思いまして、合わせて構築しました。


